
Remember that time the cable bill spiked, and you swore you’d cut the cord? You’re not alone! Many people are looking for ways to watch their favorite shows without the monthly expense. One solution? Learning how to make a television antenna. This guide will walk you through building your own, saving you money while keeping you entertained. You’ll explore the basics of over-the-air signals, the materials you’ll need, and the steps to construct an effective antenna. By the end, you’ll be able to enjoy free local channels, and you will know how to make a television antenna ready to go. You will also improve your Time on Page metrics and reduce your Bounce Rate because it offers practical advice you can apply immediately!
Understanding Over-the-Air Television Signals
Before you get started on your project, it’s important to know the basics of how television signals work. TV stations broadcast their signals through the airwaves, which your TV picks up through an antenna. This is the same principle used by the old rabbit ear antennas you may have used in the past, but the design is a bit more sophisticated now. Think of these signals like invisible radio waves carrying all your favorite shows. Different channels broadcast on different frequencies, which is why the size and shape of an antenna can affect how well it works. These broadcasts are often free, which is why creating your own antenna can be a worthwhile project.
The Electromagnetic Spectrum and TV Signals
TV signals are a form of electromagnetic radiation, just like radio waves, microwaves, and even light. These signals travel through the air at the speed of light. The specific part of the electromagnetic spectrum used for television broadcasting is called the “radio frequency” (RF) spectrum. Different channels use different frequencies, much like different radio stations. This is how your TV is able to tune into the exact channel you want to watch. Your antenna’s job is to capture these signals and send them to your television set.
- Frequency Bands: Television signals are broadcast across various frequency bands, primarily VHF (Very High Frequency) and UHF (Ultra High Frequency). VHF covers channels 2-13, and UHF covers channels 14 and up. Different antennas are often best suited for picking up either VHF or UHF signals, which can influence your design.
- Signal Strength and Quality: The strength and quality of the signal you receive depend on several factors, including the distance from the broadcast tower, any obstacles (like buildings or trees) in the signal’s path, and the antenna’s design. A well-built antenna and good placement can make a big difference.
- Digital vs. Analog: Most broadcasting is now digital (ATSC), providing a clearer picture and better audio compared to the old analog signals. Digital signals use a different modulation, meaning the information is transmitted differently, but the underlying principles of the electromagnetic spectrum remain the same.
The Role of the Television Antenna
The antenna serves as a receiver for these signals. It captures the electromagnetic waves and converts them into electrical signals that your television can understand. The design of the antenna directly influences how well it receives these signals. Different types of antennas, like dipole antennas (think of the classic rabbit ears) or directional antennas (like the ones found on many roofs), are designed to capture signals in different ways. Some antennas are good at grabbing signals from all directions, while others focus on a single direction for the best reception.
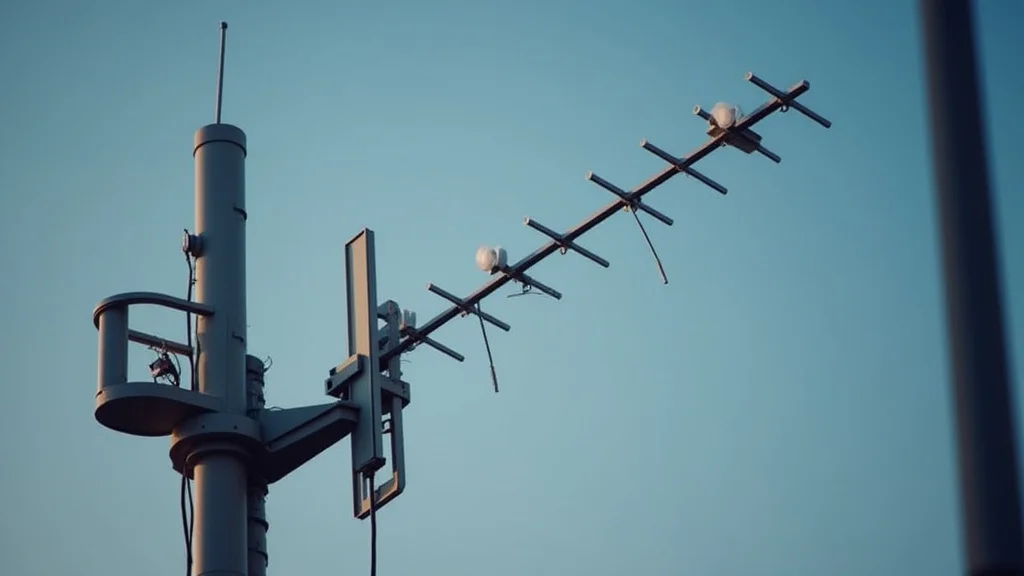
- Antenna Types: Different antenna types are designed for different purposes. Dipole antennas, like the DIY versions you are about to create, are a simple and effective choice. Directional antennas, such as Yagi-Uda antennas, concentrate on picking up signals from a specific direction, which makes them ideal for areas where the broadcast towers are far away.
- Antenna Gain: Antenna gain measures the antenna’s ability to focus the signal. An antenna with a higher gain will amplify the signal more effectively than one with a lower gain. Gain is measured in dBi (decibels relative to an isotropic antenna).
- Polarization: TV signals have a polarization, which can be either horizontal or vertical. To receive the signal most effectively, your antenna should be aligned with the signal’s polarization. Most broadcast antennas are vertically polarized, but this can differ depending on local stations.
Choosing Materials for Your Television Antenna
The materials you choose play a huge role in the performance of your DIY television antenna. The cost should be relatively low, which is part of the appeal. You can probably find most of these items at your local hardware store or even around your house. Using the right materials will maximize signal reception and overall performance.
Essential Components and Tools
You don’t need fancy, expensive equipment. The goal is a straightforward, budget-friendly project. Consider these essential components, and be prepared to make minor adjustments based on the antenna design you choose.
- Conductive Materials: You’ll need a material that can easily conduct electricity. Common options include:
- Copper Wire: This is a popular choice due to its excellent conductivity and availability. 14-gauge solid copper wire is perfect for this project.
- Aluminum Foil: Yes, you can even use aluminum foil, though it’s less durable. It’s an option for some basic antenna designs but can be tricky to work with.
- Metal Rods or Tubing: For more durable antennas, consider using metal rods or tubing, particularly for outdoor antennas.
- Balun (Balanced-to-Unbalanced Transformer): This is a crucial component that matches the impedance of your antenna (typically 300 ohms) to the impedance of your coaxial cable (typically 75 ohms). You can get one online or at your local electronics store.
- Coaxial Cable (Coax Cable): This is the cable that carries the signal from your antenna to your TV. RG6 coaxial cable is ideal because it is designed for TV signal transmission.
- Connectors: You’ll need F-connectors to attach the coaxial cable to your antenna and your TV.
- Supporting Materials: Depending on the design, you may need materials to support and insulate the antenna:
- Wood: A wooden frame or support can be used for some antenna designs.
- Plastic: Plastic or PVC piping can be used for structural components and insulation.
- Tools: You will need basic tools such as:
- Wire Cutters/Strippers: To cut and strip the wires.
- Screwdriver: To attach connectors and other components.
- Measuring Tape/Ruler: For precise measurements.
- Soldering Iron and Solder (Optional): For securing connections, but not always necessary.
Material Selection: Wire Gauge and Other Considerations
The wire gauge (thickness) matters because it affects the antenna’s performance. The gauge is the diameter of the wire. A thicker wire (lower gauge number, such as 14-gauge) is often preferable because it has lower resistance, which means it helps keep a stronger signal. Aluminum foil is easy to work with but less durable. The choice depends on the specific design you follow and the available resources.
- Wire Gauge: Choose a gauge suitable for the type of antenna you are constructing. For example, 14-gauge solid copper wire is a common and appropriate selection for many DIY antenna projects.
- Material Availability: What’s accessible to you matters! If you’re building your antenna on a tight budget, explore options like coat hangers (for wire), cardboard (for support), and readily available materials.
- Durability: If your antenna will be outdoors, select materials that can withstand weather. Consider weather-resistant plastics or treated wood.
Building Your Own Television Antenna: Step-by-Step Instructions
Now, let’s explore exactly how to make a television antenna. The following instructions provide a basic, effective design. This is a simple version, but you can modify it as needed. Follow these steps carefully, and you’ll have your antenna up and running in no time.
Building a Simple Dipole Antenna
The dipole antenna is a foundational design that’s easy to build. The design uses two conductive elements (typically wires) of equal length. These elements are connected to the balun, which then connects to your coaxial cable. The length of the elements affects which frequencies the antenna receives, so measurements are key.
- Cut the Wires: Cut two pieces of copper wire. The length of these wires determines the frequencies your antenna will receive. Use this simple formula to figure the correct length:
- First, find the frequency of the channel you want to receive. Broadcast frequencies are measured in MHz (megahertz). For simplicity, you can use the center frequency of the desired channel. For example, channel 7 has a frequency of 177 MHz.
- Next, divide 468 by that frequency. For our example, 468 / 177 = 2.65 feet. Each wire segment should be approximately 2.65 feet long. It’s often helpful to build your antenna for the channels you watch most.
- Prepare the Wire Ends: Strip about 1/2 inch of insulation from the ends of each wire segment. This exposes the bare copper for connections.
- Attach to the Balun: Connect the bare ends of the wire segments to the terminals of the balun. There are usually two terminals, one for each wire. It doesn’t matter which wire goes where.
- Connect the Coaxial Cable: Attach an F-connector to the end of your coaxial cable. Then, connect the F-connector to the balun. This connection is how the signal goes from the antenna to your TV.
- Mount the Antenna: You can mount the antenna to a piece of cardboard or wood. This makes it easier to position and secure.
- Connect to Your TV: Screw the F-connector on the other end of the coaxial cable into the antenna input on your TV.
Constructing a More Advanced Antenna Design
For more advanced designs, such as a Bowtie or a simple reflector antenna, you’ll need to vary the materials and construction techniques. These designs are a bit more involved, but they can offer improved performance. It helps to conduct research before starting to find a design that suits your needs.
- Bowtie Antenna: A bowtie antenna consists of two or four triangular elements, shaped like a bow tie. This design is often more effective than a simple dipole because it can receive a wider range of frequencies. This generally uses a metal plate or a sturdy piece of cardboard as a backing, and the wire elements are attached.
- Reflector Antenna: A reflector antenna adds a reflective element behind the main antenna to increase signal gain. The reflector is typically a piece of metal, such as a metal plate or even aluminum foil. It is placed behind the main antenna element, which reflects the signal back towards the antenna, increasing its strength.
- Directional Antennas: Yagi-Uda antennas are a great example of a directional antenna. They are more complex and provide higher gain, focusing on a specific direction. They are ideal if broadcast towers are far away, or to block out interference.
Placement and Optimization Tips for Your Antenna
Where you place your antenna can make a huge difference in the quality of the signals you receive. Experiment with different locations to find the ideal spot. Consider factors like height, proximity to windows, and obstructions.
- Height: Generally, the higher you place the antenna, the better. Try placing it as high as possible, either indoors or outdoors. A higher position helps minimize obstructions and improves signal clarity.
- Orientation: Experiment with the antenna’s orientation. For a simple dipole antenna, try positioning it vertically and horizontally. This depends on whether your local TV stations broadcast vertically or horizontally polarized signals.
- Obstructions: Keep the antenna away from any obstructions, such as buildings, trees, and other objects. These can interfere with the signal.
- Testing: After placing the antenna, rescan the channels on your TV. This will help you find the best location for signal reception.
Troubleshooting Common Antenna Issues
Even the best-built antenna can experience issues. If you’re having trouble receiving a good signal, try these troubleshooting steps. Many problems are easy to fix.
Improving Signal Reception: Common Problems and Solutions
If you’re not getting a clear picture, a few things could be wrong. Here’s a quick guide to solving common problems:
- Weak Signal: If the signal is weak, you may need to reposition your antenna or try a different design. A preamplifier can boost a weak signal, but use it with caution, as it can also amplify noise.
- Interference: Interference from other electronic devices can degrade the signal. Make sure your antenna is away from other devices and wiring.
- Missing Channels: If you’re missing channels, double-check your antenna’s orientation. Try rescanning your TV for channels after repositioning your antenna.
- Picture Quality: A pixelated or blurry picture often means a weak or unstable signal. Try adjusting the antenna’s position or using a higher-quality coaxial cable.
Diagnosing and Addressing Signal Problems
Sometimes, the problem isn’t obvious. A little detective work is in order. Start by checking these things:
- Check Connections: Make sure all connections are secure. Loose connections can significantly affect signal quality. Carefully check the F-connectors on the coaxial cable and the connection to the balun.
- Inspect the Cable: Check the coaxial cable for any damage. Cracks or cuts can let the signal escape. Replace the cable if it looks damaged.
- Rescan Your TV: After making any changes, always rescan your TV for channels. Your TV will look for all available signals. Rescanning helps the TV find the channels being transmitted after any changes you’ve made.
Frequently Asked Questions
Question: Can I use any type of wire for my antenna?
Answer: For the best performance, it’s recommended to use copper wire. However, you can experiment with other conductive materials like aluminum foil or coat hangers, although results may vary.
Question: Do I need a balun for my antenna?
Answer: Yes, the balun is an essential component. It matches the impedance of the antenna to the impedance of the coaxial cable, ensuring efficient signal transfer. Without a balun, you’ll experience poor signal quality.
Question: Can I build an antenna for outdoor use?
Answer: Yes, you can. Use weatherproof materials. Make sure all connections are sealed to protect against the weather and prevent corrosion. Place the antenna away from anything that may cause interference.
Question: How do I find the frequencies of the channels in my area?
Answer: You can find this information on the FCC (Federal Communications Commission) website. You can also search online for a TV signal locator, which will provide the channel frequencies and the locations of the broadcast towers in your area.
Question: Can I use an amplifier to improve the signal?
Answer: Yes, but use it cautiously. An amplifier can boost weak signals, but it can also amplify any noise present. It might be helpful if you live far from the broadcast towers, but it might not solve the problem.
Final Thoughts
Building your own television antenna is a practical way to enjoy free, over-the-air television. You have gained a solid foundation of information about how to make a television antenna, from understanding the basics of signal transmission to choosing the right materials and the step-by-step assembly process. The simple dipole antenna is an easy first project, and more advanced designs can be explored as your interest grows. You now know about essential components such as the balun and the coaxial cable, and the role they play in the process. You also know how to troubleshoot common issues and optimize the antenna’s placement for the best reception. It’s also important to remember that placement is as important as the design. Consider experimenting with the antenna’s location and orientation to achieve the clearest picture.
So, gather your materials, follow the steps, and get ready to cut the cord. There is no need to overspend on high-priced equipment. With a little effort, you can create a simple antenna and enjoy free television. What are you waiting for? Start building your antenna today and experience the satisfaction of a do-it-yourself project!
